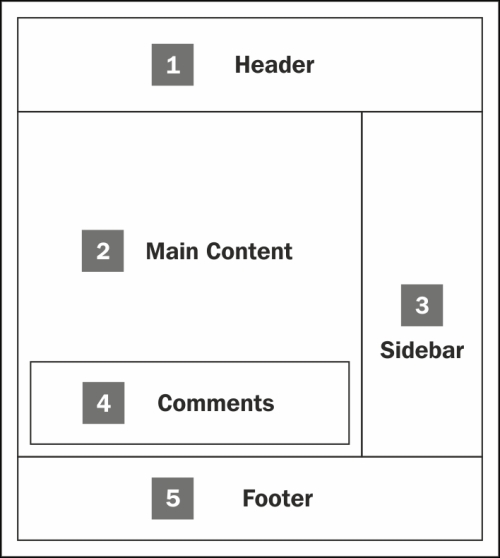
On previous chapters we created simple blogger theme from scratch and published a post to see how it looks.
Also we got basic concepts on sections and widgets / gadgets.
Now we are going to use that knowledge to create more complex responsive theme / template containing header, sidebar, footer, etc.
Since we want to make a professional Blogger theme template, we should work on full responsive HTML template that contains Header, Navbar, Main, Sidebar, Footer etc.
Go to Blogger Dashboard → Theme → Edit HTML and clean up (delete) all codes from your current theme.
Now copy the following Bootstrap HTML template and paste it to blogger html editor. Here bootstrap is used as an easy responsive css framework (but you can use any other framework or your own responsive css code).
  <html lang="en">
    <head>
      <meta charset="utf-8"/>
      <meta http-equiv="X-UA-Compatible" content="IE=edge"/>
      <meta name="viewport" content="width=device-width, initial-scale=1"/>
      <!-- The above 3 meta tags *must* come first in the head; any other head content must come *after* these tags -->
      <title>My First Blogger Theme</title>

      <!-- Bootstrap -->
      <!-- Latest compiled and minified CSS -->
    <link rel="stylesheet" href="https://maxcdn.bootstrapcdn.com/bootstrap/3.3.7/css/bootstrap.min.css" integrity="sha384-BVYiiSIFeK1dGmJRAkycuHAHRg32OmUcww7on3RYdg4Va+PmSTsz/K68vbdEjh4u" crossorigin="anonymous"/>

    <!-- Latest compiled and minified JavaScript -->
    <script src="https://maxcdn.bootstrapcdn.com/bootstrap/3.3.7/js/bootstrap.min.js" integrity="sha384-Tc5IQib027qvyjSMfHjOMaLkfuWVxZxUPnCJA7l2mCWNIpG9mGCD8wGNIcPD7Txa" crossorigin="anonymous"></script>

      <!-- HTML5 shim and Respond.js for IE8 support of HTML5 elements and media queries -->
      <!-- WARNING: Respond.js doesn't work if you view the page via file:// -->
      <!--[if lt IE 9]>
        <script src="https://oss.maxcdn.com/html5shiv/3.7.3/html5shiv.min.js"></script>
        <script src="https://oss.maxcdn.com/respond/1.4.2/respond.min.js"></script>
      <![endif]-->

      <b:skin><![CDATA[
      /**PUT YOUR ALL CSS HERE**/
      ]]></b:skin>
    </head>
    <body>
      <div class="header-wrapper">
        <div class="container">
          <div class="brand">
            <!--Put Header Section Here-->

          </div>
        </div>
      </div>
      <div class="content-wrapper">
        <div class="container">
          <div class="row">
            <div class="col-md-9">
              <div class="post-wrapper">
                <!--Put Main Section Here-->

              </div>
            </div>
            <div class="col-md-3">
              <div class="sidebar-wrapper">
                <!--Put Sidebar Section Here-->

              </div>
            </div>
          </div>
        </div>
      </div>
      <div class="footer-wrapper">
        <div class="container">
          <p>Powered by <a href="http://www.blogger.com">Blogger</a></p>
        </div>
      </div>

      <script src="https://ajax.googleapis.com/ajax/libs/jquery/1.12.4/jquery.min.js"></script>
    </body>
  </html>
Now we will work on this template. This works as starter template for any other professional blogger theme designs too.
To show posts, it needs a section. Creating a section on Blogger theme is very easy.
Here are posts about SECTION AND WIDGET in blogger:
What are SECTION and WIDGET in Blogger?
RULES OF CREATING SECTION and WIDGET IN BLOGGER.
Comparison Between SECTION AND WIDGET in Blogger
Now again proceeding to coding, we should make this blogger theme dynamic so add following codes in the above code :
Making a Dynamic Header: (Put the following code in header div)
<b:section class='header' id='header' maxwidgets='1' showaddelement='yes'>
    <b:widget id='Header1' locked='true' title='' type='Header'/>
</b:section>
Making Dynamic Blog Post: (Put the following code in post div)
<b:section class='main' id='main' showaddelement='no'>
    <b:widget id='Blog1' locked='true' title='Blog Posts' type='Blog' version='1'/>
</b:section>
Making Dynamic Sidebar: (Put the following code in sidebar div)
<b:section class='sidebar' id='sidebar' preferred='yes' showaddelement='yes'>
</b:section>
Making a Dynamic Footer: (Put the following code in footer div)
<b:section class='footer' id='footer' preferred='yes' showaddelement='yes'>
</b:section>
Uses of Dynamic Default Data in Blogger
Blogger offers some default data tags by which we can call specific data to show. Example: If we want to the name of author of published post in every post, then we can use <data:post.author/> .
Use this after the following tags.
<div class='post-footer-line post-footer-line-1'>Similarly, there are many Blogger data tags to show specific data in published Blog. This Blogger Data Tags will work only in Blog widget.
| Blogger Data Tags | Output |
|---|---|
<data:post.dateHeader/> | The post's date as header. |
<data:title/> | The blog's title. |
<data:description/> | The blog's description. |
<data:olderPageTitle/> | Title of the older page of posts. |
<data:newerPageTitle/> | Title of the newer page of posts. |
<data:commentLabel/> | Number of Comments. |
<data:authorLabel/> | It will show "posted by". |
<data:post.title /> | The post's title. |
<data:post.body/> | The post's content. |
<data:post.author/> | The post's author name. |
<data:post.url/> | The post' url link. |
<data:post.timestamp/> | The post's date and time. |
<data:label.name/> | The post's label. |
More on Layouts Data Tags can be found at: https://support.google.com/blogger/answer/47270
Dynamic Anchor Tag in Blogger
Dynamic Anchor In Blogger is converted to general anchor text with URL.
Example: If the URL of homepage be http://blogger. theinfiniteinfo.com then the following tag
<a expr:href='data:blog.homepageUrl >Homepage</a>
will be converted to:
<a href="http://blogger.theinfiniteinfo.com">Homepage</a>
Some dynamic anchor tags for Blogger Theme:
| Dynamic Anchor URL | Output |
|---|---|
<a expr:href='data:blog.homepageUrl >Homepage</a> | A text with homepage’s URL |
<a expr:href='data:post.url'>Read More</a> | Read More Text with Post’s URL |
<a expr:href='data:label.url' property='v:title' rel='v:url'><data:label.name/></a> | Label Name with Label’s URL |
<a expr:href='data:post.newerLinkUrl'><data:post.newerLinkText/></a> | Newer Post Text with Newer Post URL |
<a expr:href='data:post.olderLinkUrl'><data:post.newerLinkText/></a> | Older Post Text with Older Post URL |
<a expr:href='data:comment.authorUrl' rel='nofollow'><data:comment.author/></a> | Author’s name with URL |
<a expr:href='data:comment.url' title='comment permalink'><data:comment.timestamp/></a> | Comment Text to comment with URL |
We will learn in next chapter about:
ADVANCED DYNAMIC OPERATION to Show/Hide Custom Design, Landing page depending on page type and URL


No comments:
Post a Comment